Small Crochet
Heart
Using DK & a 4 or 4.5mm hook OR use Chunky & a 6 or 6.5mm hook.
I have written this pattern to help my pupils to (A) understand pattern ready a little better & (B) to help them with increasing & decreasing. You will find that there are a few "helpers" in brackets along the way....
Row 1 – 2ch, 3dc into 2nd chain from hook (one closest to
the knot) Turn (3sts)
Row 2 – 1ch (does
NOT count as a stitch) 1dc into each st to end, Turn (3sts)
Row 3 – 1ch (does
NOT count as a stitch) 2dc into base of 1ch you just made, 1dc into next st
& then 2dc into last stitch, Turn (5sts)
Row 4 – 1ch (same
as above) 1dc in each st to end, Turn (5sts)
Row 5 – 1ch (same
as above) 2dc into base of 1ch you just made, 1dc along the row until the last
st then 2dc into last st, turn (7sts)
Rows 6 & 7 – Repeat rows 4
& 5 (9sts)
Rows 8, 9 & 10 – 1ch (as above) 1dc to end, Turn (9sts)
DO NOT FASTEN OFF & DO NOT WORRY
IF YOUR EDGE LOOKS A LITTLE UNTIDY
To Shape the top - you will be working on one half of the top
of the heart only here…
Row 11 – 1ch (same
as above) 1dc into next 4st, Turn (4sts)
Row 12 – 1ch (as
above) dc2tog over 2sts, dc2tog in last 2sts (2sts)
Row 13 – 1ch,
dc2tog (1sts)
FASTEN OFF - DO NOT
TURN
RETURN TO THE TOP OF ROW 10 – MISS THE CENTER DC AND JOIN WOOL
INTO THE NEXT DC
Row 11 – 1ch (as
above) 1dc in same place (into st where you joined your wool) 1dc into
remaining sts (4st)
Row 12 – 1ch (as above) dc2tog using first
2st, dc2tog on last 2st (2sts)
Row 13 – 1ch, dc2tog (1sts) DO NOT FASTEN OFF.
To Finish:
1ch, dc
evenly around the heart edge putting 1dc, 1ch, 1dc at the bottom (where you
originally started) Optional - You can then dc evenly around again in a different colour or even Eyelash or Tinsel Yarn!
OPTIONAL:
Add a hanging loop by making approx. 20ch. Fasten to Heart. Sew in ends.
How to make a Chunky Cowl
I have been meaning to make a Cowl to match my Chunky Beanie Hat and after searching my many Crochet Books and various websites, I decided to go it alone.
You will need:
A ball of Chunky Wool - I used Patons Caressa Express
6.5mm Hook
Stitch Used: UK Treble Crochet or US Double Crochet
Abbreviations: BLO = Back Loop Only
Start by making 55 chains
TIP: If you are using a larger hook then make fewer chains e.g. with a 9mm hook you will only need to chain 48 - measure the foundation chain around your head for a bespoke fit!
And join with a slip stitch into the first chain to make a large loop / ring
TIP: Make sure your loop / ring is not twisted when you join it
Your Loop / Ring should look something like this
Now make 2 chains (I know we are working in Trebles, but I find that 2 chains works better - a tip I picked up from a Hat pattern some time ago.
Then work treble crochets into the foundation chain
When you get to the joining stage, do not slip stitch into the 2nd chain of the turning chain but the next one along
In the photo above, the point of the hook is resting on the 2nd chain but I will slip stitch into the chain that's just above the hook point.
This will help to close the gap in the join or seam.
Like above.
Then make 2 chains and Treble Crochet into each Treble below but into the BLO - the BACK LOOP ONLY
This will give a nice "ridged" effect all along the row
This is my hook going into the BLO
And the "ridged" effect
Continue to work as many rows as you would like your Cowl to be.
At the end, with the last loop remaining on the hook, slip stitch into the 2nd chain away from the hook then fasten off and darn in the end. I find that this gives you a smoother finish.
I managed 8 rows from my ball of wool.
And here it is!
A nice chunky Cowl to keep you warm this winter!
One other thing that I find is that your original knot can stick out a bit, so I undo this, leaving a loop, insert my hook and then slip stitch into the 2nd chain away (going backwards if you like) from the hook then fasten off. This creates a nicer / smoother finish.
p.s. Can you see some of my wool stash in the book shelves behind me?
Any Questions?? Please ask away OR leave a comment at the bottom of this page.
This Tutorial is FREE for you to use, however please do not copy any part of this tutorial without prior permission. If you would like to make a donation to fund further tutorials then please click on the button below.
BUNTING
"GRANNY"
STYLE
I have had a lot of requests for the Bunting that I featured on a post recently, so here's how to make it!
Start as you would a Granny Square (See How to make a Granny Square in the tutorial above)
so make
4ch
join to form a ring
3 chains then 2 trebles (that's 1 Granny Shell)
3 ch
1 Granny Shell (3 trebles)
3 ch
1 Granny Shell
3 ch
Join with a Sl St into 3rd chain you made at the beginning
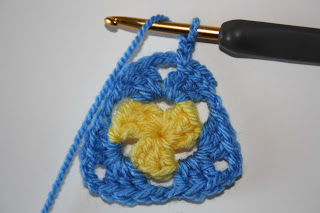
You will have 3 Granny Shells & 3 chain "spaces"
IF YOU WANT TO CHANGE COLOUR HERE THEN FIND THE "HOW TO CHANGE COLOUR IN A GRANNY SQUARE" TUTORIAL ON THIS PAGE.
if you want to make plain / one colour bunting, then slip stitch across to the 3 chain space.
Now you start Row 2 by making
3 chains, 2 trebles, 3ch, 1 granny shell
All into the 3 chain space
1 chain
1 Granny Shell
3 ch
1 Granny Shell
into the NEXT 3 chain space
1 Granny Shell
3ch
1 Granny Shell
into the LAST 3 chain space
1 ch and join as before
Row 3
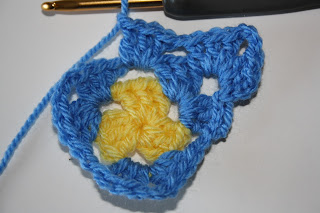
As you can see in the photo below, I am staying with the Blue for row 3 so I have slip stitched across to the 3 chain space to reposition the wool & to start row 3
3 chains, 2 trebles, 3ch, 1 granny shell
All into the 3 chain space
1 chain
1 Granny Shell into the one chain space of row 2
1 chain
Repeat in the next corner
and continue to repeat the sequence of
1 GS, 3ch, 1GS, 1ch, 1GS, 1ch
Until you are back to where you started!
Now it' up to you how many rows you make your Bunting
Simple follow the sequence all the way around, ADDING an extra GS and a chain either side of that GS on each edge.
So Row 4 =
A Corner of 1GS, 3ch, 1GS then
1ch,1GS,1ch, 1GS,1ch
And Row 5 will =
A Corner of 1GS, 3ch, 1GS then
1ch,1GS,1ch, 1GS,1ch, 1GS, 1ch (so an extra 1ch, 1GS, 1ch at the end)
I have worked my Bunting to 5 rows.
Can you see the difference?
So you will have to block your Bunting
This is what I do:
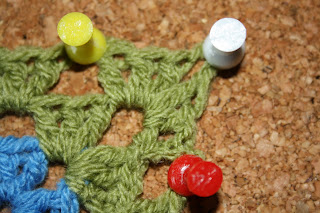
I pin my Bunting out on a cork board with normal cork board pins
stretching it just a little bit
and then I spray it with Spray Starch
and put the board on a warm radiator to "bake" for a bit!!
And once it's dry, you can add it to the others!!
Simply crochet a long chain in a colour of your choice and then "pick up" the top of each triangle of bunting with either a double crochet or a single crochet - see which one you prefer - just remember to space each bunting triangle out evenly.
You could really brighten up any room or outside space with this bunting
I have placed mine in my hallway to cheer up an otherwise boring space
You can even thread some buttons onto the wool before you start making your chain
and slide them down as and when you want them to sit in place
I look forward to seeing your Bunting! Do send my your pictures.
Thanks
Any Questions?? Please ask away OR leave a comment at the bottom of this page.
This Tutorial is FREE for you to use, however please do not copy any part of this tutorial without prior permission. If you would like to make a donation to fund further tutorials then please click on the button below.
Ripples Blanket
Here is my Ripples Blanket in Progress
I promised that I would share the pattern with you
So I hope that you can follow this very simple tutorial
Via a Crochet Chart Diagram
Just remember to put 2 trebles into the very first chain/stitch (or 3 chains to count as one treble + one treble) and the last chain too!
You can do as many or as little colour changes as you want too - make it unique and do it your way!
Here I have used DK weight yarn with a 4mm hook
**Remember to make a "Sampler" first, so chain 39 as above and give it a go for a few rows (with or without colour changes) before you chain, for example 240 chains and make a mistake!**


Ali
ReplyDeleteThank you for all of your tutorials. I love the step by step directions you give and the photos to go along. I am going to use some of these for some of granny square projects. Thanks again.
Julie - USA
Your step by step instructions and pictures to go with them are great Ali. I love the way you explain.
ReplyDeleteThanks for your tutorials!
ReplyDeleteThank you all for your lovely comments x
ReplyDeletethanks for free tutorials!
ReplyDelete